Ruby on RailsのAPIモードでログイン機能の実装をする
概要
タイトルのとおりです。
Rails APIを使ってログイン機能の実装を行います。
今回はサーバーサイドオンリーです。
Googleの拡張機能でデータをPOSTして、テーブルに格納できていることを確認できればゴールとします。
そのうち、フロントサイドも含めた記事を書く予定ですが、その時の参照先となる記事です。
前提
すでにRailsのプロジェクトがある。
手順概要
実装するための手順の概要です。
やること
devise_token_authのgemのインストール
では早速いきましょう。
まずはGemfileに追加です。
devise_token_authはTwitterやFacebookでの認証にも対応することができ、omniauthというGemをインストールすることで使用可能になるのですが、今回はこれらの認証方法は使わないので、omniauthはインストールしません。
devise_token_authを利用する上でインストールすべきGemは devise と devise_token_auth なのですが、
ユーザのデータはJSONでやりとりしたいので jbuilder を、
またクロスドメイン対策のために rack-cors もインストールします。
source 'https://rubygems.org'

git_source(:github) do |repo_name|
  repo_name = "#{repo_name}/#{repo_name}" unless repo_name.include?("/")
  "https://github.com/#{repo_name}.git"
end


# Bundle edge Rails instead: gem 'rails', github: 'rails/rails'
gem 'rails', '~> 5.1.5'
gem 'rake', '~>12.3.2'
# Use mysql as the database for Active Record
gem 'mysql2', '>= 0.3.18', '< 0.5'
# Use Puma as the app server
gem 'puma', '~> 3.7'
# Build JSON APIs with ease. Read more: https://github.com/rails/jbuilder
gem 'jbuilder', '~> 2.5'          <- JSONでデータのやりとりを行う想定のためコメントアウトを外す
# Use Redis adapter to run Action Cable in production
# gem 'redis', '~> 4.0'
# Use ActiveModel has_secure_password
# gem 'bcrypt', '~> 3.1.7'

# Use Capistrano for deployment
# gem 'capistrano-rails', group: :development

# Use Rack CORS for handling Cross-Origin Resource Sharing (CORS), making cross-origin AJAX possible
gem 'rack-cors'                    <- クロスドメイン対策のために利用するため、コメントアウトを外す

# This is for authentication based on token
gem 'devise'                                <- 追加
gem 'devise_token_auth'                     <- 追加

group :development, :test do
  # Call 'byebug' anywhere in the code to stop execution and get a debugger console
  gem 'byebug', platforms: [:mri, :mingw, :x64_mingw]
end

group :development do
  gem 'listen', '>= 3.0.5', '< 3.2'
  # Spring speeds up development by keeping your application running in the background. Read more: https://github.com/rails/spring
  gem 'spring'
  gem 'spring-watcher-listen', '~> 2.0.0'
end

# Windows does not include zoneinfo files, so bundle the tzinfo-data gem
gem 'tzinfo-data', platforms: [:mingw, :mswin, :x64_mingw, :jruby]
Gemfileの編集が終わったらこれらのGemをインストールします。
$ bundle install --path ./vendor/bundle
(プロジェクトごとに管理するgemを変えたいのでローカル(./vendor/bundle)にインストールします。
ここまでエラーなく終了すれば、1st ステップ終了です。
テーブルの作成・マイグレーション
では次はユーザ認証のために使用するクラスや、それに対応するテーブルを作っていきます。
devise_token_authのコントローラ等の作成
$ bundle exec rails g devise_token_auth:install User auth
(bundle exec は必要に応じてつける)
フォーマットは
$ rails g devise_token_auth:install [USER_CLASS] [MOUNT_PATH]
です。
[USER_CLASS] はユーザ認証に使用するクラスの名前です。何も指定しなければUserとなります。
[MOUNT_PATH] は認証のルーティングをマウントするパスです。何も指定しなければauthとなります。
認証のルーティングをマウントとは、要はURLのことで、authだと例えばサインインのURLはGET、POSTともに /auth/sing_in のようになります。
$ bundle exec rails g devise_token_auth:install User auth
      create  config/initializers/devise_token_auth.rb
      create  db/migrate/xxxxxxxxxxxxxx_devise_token_auth_create_users.rb
      create  app/models/user.rb
      insert  app/controllers/application_controller.rb
        gsub  config/routes.rb
となればOK!!
user.rbとマイグレーションファイルの修正
そうすると、 user.rb とマイグレーションファイルが作成されるのでそちらを修正していきます。
class User < ActiveRecord::Base
  # Include default devise modules. Others available are:
  # :confirmable, :lockable, :timeoutable and :omniauthable
  devise :database_authenticatable, :registerable,
         :recoverable, :rememberable, :trackable, :validatable
  include DeviseTokenAuth::Concerns::User
end
もともとconfirmableやomniauthableがコメントアウトされていましたが、もしコメントアウトされていなければコメントアウトしておきましょう。
confirmableはメールを送信して確認する機能を実装するためのもの、omniauthableは先程のTwitterやFacebookでの認証を指しています。
今回は使いません。
次はマイグレーションファイルを修正します。
confirmableがコメントアウトされていなかったので、コメントアウトします。
また、このコメントアウトに伴って confirmation_token に対して張られているindexの記述もコメントアウトします。
今回は、
- 名前
- ニックネーム
- メールアドレス
- 画像
がデフォルトで記述されていたので、それをそのまま使用します。
class DeviseTokenAuthCreateUsers < ActiveRecord::Migration[5.1]
  def change

    create_table(:users) do |t|
      ## Required
      t.string :provider, :null => false, :default => "email"
      t.string :uid, :null => false, :default => ""

      ## Database authenticatable
      t.string :encrypted_password, :null => false, :default => ""

      ## Recoverable
      t.string   :reset_password_token
      t.datetime :reset_password_sent_at
      t.boolean  :allow_password_change, :default => false

      ## Rememberable
      t.datetime :remember_created_at

      ## Trackable
      t.integer  :sign_in_count, :default => 0, :null => false
      t.datetime :current_sign_in_at
      t.datetime :last_sign_in_at
      t.string   :current_sign_in_ip
      t.string   :last_sign_in_ip

      # ## Confirmable                        ========= コメントアウトここから
      # t.string   :confirmation_token
      # t.datetime :confirmed_at
      # t.datetime :confirmation_sent_at
      # t.string   :unconfirmed_email # Only if using reconfirmable
                                              ========= コメントアウトここまで

      ## Lockable
      # t.integer  :failed_attempts, :default => 0, :null => false # Only if lock strategy is :failed_attempts
      # t.string   :unlock_token # Only if unlock strategy is :email or :both
      # t.datetime :locked_at

      ## User Info
      t.string :name
      t.string :nickname
      t.string :image
      t.string :email

      ## Tokens
      t.text :tokens

      t.timestamps
    end

    add_index :users, :email,                unique: true
    add_index :users, [:uid, :provider],     unique: true
    add_index :users, :reset_password_token, unique: true
    # add_index :users, :confirmation_token,   unique: true      <- コメントアウト
    # add_index :users, :unlock_token,       unique: true
  end
end
完了したらマイグレーションファイルを適用しましょう。
$bundle exec rake db:migrate
== 20190127155844 DeviseTokenAuthCreateUsers: migrating =======================
-- create_table(:users)
   -> 0.0580s
-- add_index(:users, :email, {:unique=>true})
   -> 0.0552s
-- add_index(:users, [:uid, :provider], {:unique=>true})
   -> 0.0501s
-- add_index(:users, :reset_password_token, {:unique=>true})
   -> 0.0500s
== 20190127155844 DeviseTokenAuthCreateUsers: migrated (0.2139s) ==============
となっていればOKです!!
ここまででテーブルの作成・マイグレーションが完了しました。
devise_token_authを使ったトークン認証の実装
さぁ、いよいよ実装に入ります。
コードって書いてる時間より紙上とかエクセルとかで考えてる時間のほうが長いですよね。
どうでもいいですけど。
ちなみに今の状態で bundle exec rake routes をすると、
new_user_registration GET /auth/sign_up(.:format) devise_token_auth/registrations#new
のようなパスが表示されています。
コントローラの作成
さて、 bundle exec rails g controller api/v1/auth/registrations を実行します。
$bundle exec rails g controller api/v1/auth/registrations
Running via Spring preloader in process 6670
      create  app/controllers/api/v1/auth/registrations_controller.rb
      invoke  test_unit
      create    test/controllers/api/v1/auth/registrations_controller_test.rb
と表示されればOK。
作成されたコントローラを編集して以下のようにします。
# registrations_controller.rb
module Api
  module V1
    module Auth
      class RegistrationsController < DeviseTokenAuth::RegistrationsController
        private
        def sign_up_params
          params.permit(:name, :nickname, :email, :img, :password, :password_confirmation)
        end

        def account_update_params
          params.permit(:name, :nickname, :email, :img)
        end
      end
    end
  end
end
ルートの編集
次はルートを編集します。デフォルトのコントローラではなく、DeviseTokenAuth::RegistrationsControllerを継承したコントローラを使うようにします。
# routes.rb
Rails.application.routes.draw do
  namespace :api do
    scope :v1 do
      mount_devise_token_auth_for 'User', at: 'auth', controllers: {
          registrations: 'api/v1/auth/registrations'
      }
    end
  end
end
さて、ルートが確認しましょう。 $ bundle exec rake routes を実行します。
new_api_user_registration GET /api/v1/auth/sign_up(.:format) api/v1/auth/registrations#new
URIがちゃんと変わってますね!
実装としては以上です。
Initializerの編集
もろもろの設定を触ります。
config.change_headers_on_each_request = true にするとリクエストごとにトークンを新しくする必要があります。
なのでコメントアウトを外してfalseにしたいです。
そして、ずっと同じトークンを使い続けるわけにもいかないので config.token_lifespan = 2.weeks のコメントアウトも外します。
以上で、サーバー側の実装完了です。
試しに適当にデータを投入してテストしてみましょう。
Restlet Clientを使ってテスト
まずは rails s でrailsをローカルで起動します。
ユーザ作成
http://localhost:3000/api/v1/auth に対して、POSTメソッドでリクエストを投げます。
Request Body
{
  "name": "kenny takimura",
  "nickname": "kenny",
  "email": "kennytakimura@example.com",
  "password": "password",
  "password_confirmation": "password"
}

200ステータスが返ってきてますね。
Response見てみましょう。
Response
**idは人によって違うかもしれないです。
僕はすでにいくつかユーザ登録していたので新規登録でidが4になっています。
{
 "status": "success",
 "data":{
  "id": 4,
  "provider": "email",
  "uid": "kennytakimura@example.com",
  "allow_password_change": false,
  "name": "kenny takimura",
  "nickname": "kenny",
  "image": null,
  "email": "kennytakimura@example.com",
  "created_at": "2019-01-28T16:00:20.000Z",
  "updated_at": "2019-01-28T16:00:21.000Z"
 }
}
テーブルも確認しましょう。

ちゃんとデータが入ってますね。
ログイン
ついでにログインも確認しておきましょう。
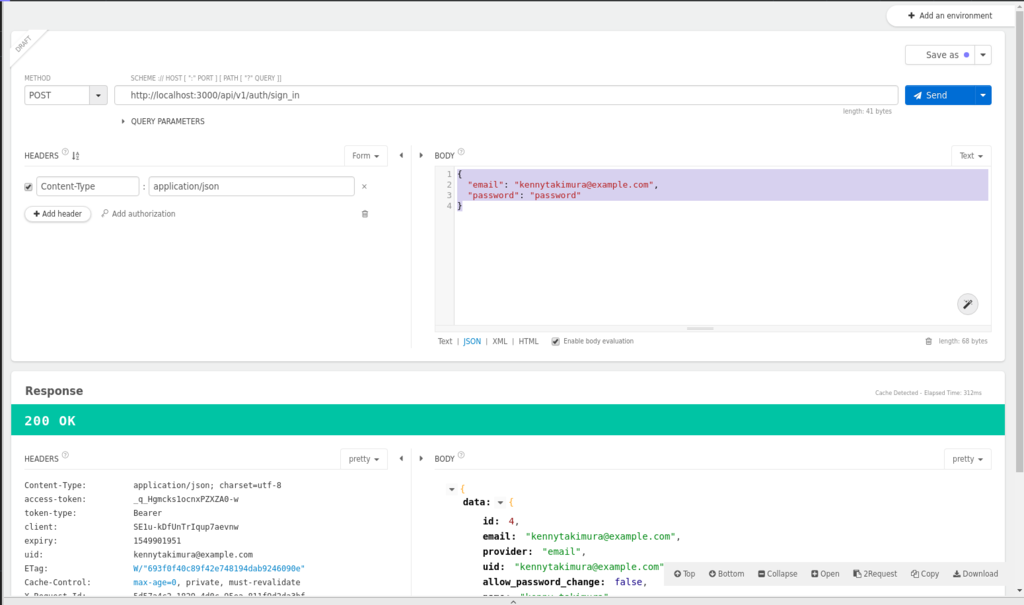
ログインするためには http://localhost:300/api/v1/auth/sign_in に対してPOSTメソッドでリクエストを投げます。
Request Body
{
  "email": "kennytakimura@example.com",
  "password": "password"
}

こちらも200ステータスが返ってきてます。
Responseは
Response
{
 "data":{
  "id": 4,
  "email": "kennytakimura@example.com",
  "provider": "email",
  "uid": "kennytakimura@example.com",
  "allow_password_change": false,
  "name": "kenny takimura",
  "nickname": "kenny",
  "image": null
 }
}
先ほど登録したデータが返ってきます。
idも4です。
いい感じですね。
おわりに
想像してたより簡単に実装できました。
他にもいろんなサイトで実装方法が紹介されているので、見てみるといいかもしれないです。
私は基本的には公式サイト
Installation - devise-token-auth
をベースに、
web帳 | Rails5 + devise token authで作る 認証API
や
[Rails5] devise_token_auth でAPIを作成する / 新規登録・ログイン | tackeyy.com
を参考に実装していきました。
次はフロントとのつなぎも書いていこうと思います。
それでは!